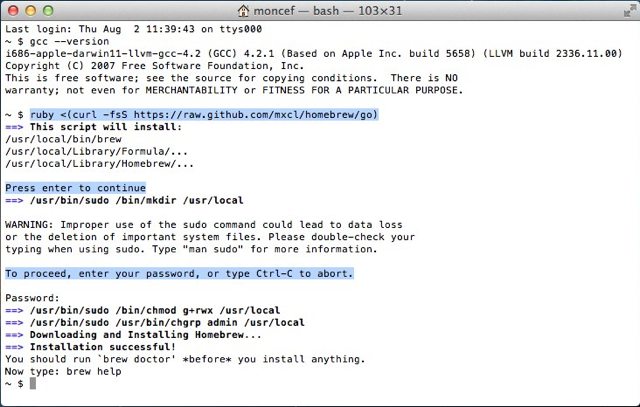
Run the command, and follow the instructions when prompted, as
highlighted in the screenshot below. Note that Terminal does not provide
visual feedback when you type your password. Just type it slowly and
press return.
Once the installation is successful, run the following command:
1
$ brew doctor
If you get Your system is ready to brew, you can move on to Step 4. Otherwise, continue reading to learn how to fix errors and warnings you might run into.If you get Warning: Experimental support for using Xcode without the "Command Line Tools", you probably upgraded from Lion to Mountain Lion but didn’t reinstall the Command Line Tools. See the important note in Step 1.
If you get Error: No such file or directory - /usr/local/Cellar, run the following command, which creates the /usr/local/Cellar directory:
1
$ sudo mkdir /usr/local/Cellar
sudo allows you to run commands as a user with higher access rights, which is why it prompts you for your password, and mkdir stands for “make directory.”If you get /usr/local/etc isn't writable or Cannot write to /usr/local/Cellar (or any other directory inside /usr/local), fix it with this command:
1
$ sudo chown -R `whoami` /usr/local
This makes you the owner of the /usr/local directory, in addition to all nested directories.chown stands for “change owner,” the -R flag applies this to all nested files and directories, and whoami is a variable that represents your OS X username. You should copy and paste the command above as is.
To learn more about any Unix command, type man (for “manual”), followed by the command. For example:
1
$ man chown
If a manual is longer than a page long, it will display a :
at the end to signify there is more to read. To display one additional
line at a time, press return. To display an additional page at a time,
press the space bar. To quit at any time, press q.Run brew doctor again. If you get Your system is ready to brew, you can move on to the next step. If you get Warning: /usr/bin occurs before /usr/local/bin, run this:
This command takes everything between the single quotes and adds it (>>) to a file called .bash_profile in your user’s root directory (~/). Every time you open a new Terminal window or tab, .bash_profile is called. The export PATH line tells your system to look in /usr/local/bin first. In Step 4, I explain why this is important.Quit and relaunch Terminal, then run brew doctor once more. Your system should be ready to brew now.
If you’re on Lion, you might get this:
12345678910
Warning: Your Xcode is configured with an invalid path.
You should change it to the correct path. Please note that there is no correct
path at this time if you have *only* installed the Command Line Tools for Xcode.
If your Xcode is pre-4.3 or you installed the whole of Xcode 4.3 then one of
these is (probably) what you want:

    sudo xcode-select -switch /Developer
    sudo xcode-select -switch /Applications/Xcode.app/Contents/Developer

DO NOT SET / OR EVERYTHING BREAKS!
Run brew doctor to verify. Your system should be ready to brew now.
Step : Install RVM with the latest Ruby (2.0.0) and Rails (3.2.13)
RVM stands for Ruby Version Manager,
and is one of the most popular tools that allow you to install and
manage multiple versions of Ruby and Rails on the same computer.
RVM has come a long way since I originally published this tutorial.
As of March 30, 2013, you can now install the latest RVM, Ruby, and
Rails in one step with this command:
I verified this on a clean installation of Mountain Lion 10.8.3, but I have not tested it on Snow Leopard or Lion.This will take a few minutes, and once it’s done, quit and relaunch Terminal, then run this command:
1
$ type rvm | head -1
If you get rvm is a function, that means RVM was successfully installed. If not, go to the Troubleshooting section.To make sure the latest versions of RVM, Ruby and Rails were installed, run the commands below: For RVM
1
$ rvm -v
You should get rvm 1.19.1 or higher.For Ruby
1
$ ruby -v
You should get ruby 2.0.0p0 or higher.For Rails
1
$ rails -v
You should get Rails 3.2.13 or higher.To make sure your system is still ready to brew:
1
$ brew doctor
If everything went well, you’re done! Your machine is now set up with the basic tools for web development.If you run into any other issues, please let me know
and I will do my best to help you. If you got any value out of my
tutorial, I have more time-saving tips and tricks for you in my free newsletter. If you’re feeling really appreciative, you can also donate, which will automatically give you a discount for any paid courses I will release in 2014.
Troubleshooting
In some cases, brew doctor might show you this warning:
123456789101112
Warning: Some keg-only formula are linked into the Cellar.
Linking a keg-only formula, such as gettext, into the cellar with
`brew link <formula>` will cause other formulae to detect them during
the `./configure` step. This may cause problems when compiling those
other formulae.

Binaries provided by keg-only formulae may override system binaries
with other strange results.

You may wish to `brew unlink` these brews:

libxml2
Homebrew messages are generally very helpful and they let you know
exactly what to do. In this case, it is telling you to fix the linking
issue by running brew unlink, followed by the tools (or
“brews”) that need to be unlinked. Here, there is only one tool that
needs to be unlinked. Therefore, you should run this command:
1
brew unlink libxml2
If it listed more than one tool, you would add them to the command separated by a space, like so:
1
brew unlink tool1 tool2 tool3
Run brew doctor once more, and you should be ready to brew now.
Just like the command we saw in Step 4, this adds everything between the single quotes to your .bash_profile, which ensures that every time you start a new Terminal session, you will be able to use all of RVM’s commands.Now that .bash_profile has been modified, it needs to be reloaded.
For initial RVM installations, the preferred way to do this is to quit
and relaunch Terminal. Otherwise, you can use the following command:
1
$ source ~/.bash_profile
If all went well, you should see rvm is a function after you run this command:
1
$ type rvm | head -1
Next Steps
Once you start hacking away on your computer, you will most likely
need to install more tools with Homebrew. Before you do, remember to
always run brew update and brew doctor to make sure your system is still ready to brew. To upgrade your existing packages, run brew upgrade.
If you installed the full Xcode package, remember that when you
update it via the Mac App Store, you might also need to update the
Command Line Tools via Xcode’s Preferences. If you installed the
standalone CLT, I recommend checking for a new version once a month or
so.
If you followed this tutorial because you’re interested in Rails development, I recommend visiting Daniel Kehoe’s excellent RailsApps Project.
If you want to install another version of Ruby besides 2.0.0, follow the instructions below.
Installing other versions of Ruby, such as 1.9.3
Before you install a version of Ruby with RVM, you should make sure you have the latest version of RVM:
1
$ rvm get stable --autolibs=enable
Then run:
1
$ rvm install 1.9.3
To see all the versions of Ruby installed via RVM:
1
$ rvm list rubies
This output also lets you know which version is the default and which one is the current one in use.To use a specific version (2.0.0 in the example below) and also set it as the default version for new shell sessions:
1
$ rvm use 2.0.0 --default
To verify:
1
$ ruby -v
The version should match that of the current Ruby in use.
Previous Notes
Installing Ruby on Snow Leopard and Lion is presumably as easy as on
Mountain Lion, but I haven’t been able to verify that. The instructions
below are based on my experience in 2012. I’ve left them here for
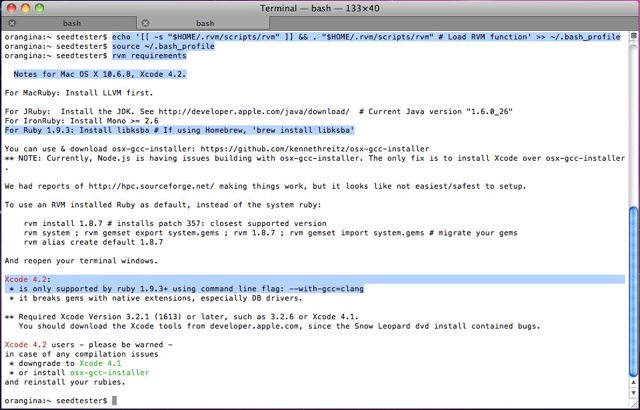
reference but I’m not sure if they still apply. For example, running rvm requirements used to provide instructions specific to your environment, but now it tries to install all the requirements for you.
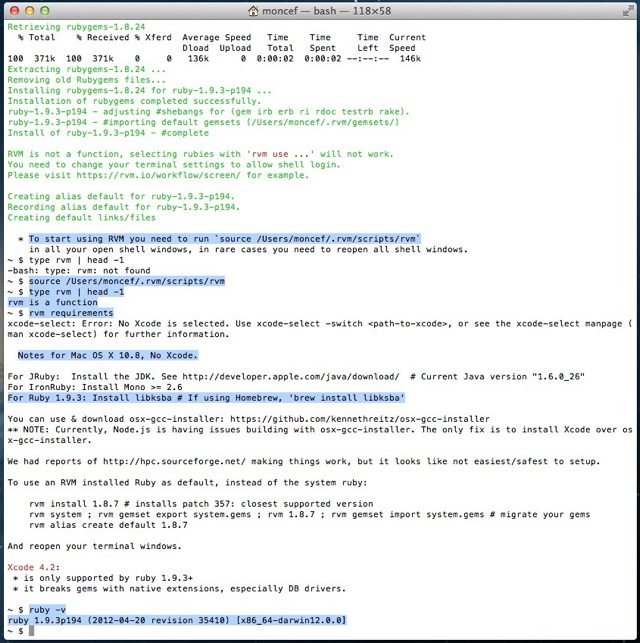
The screenshots below are examples of the kind of output rvm requirements would show. One is for Snow Leopard 10.6.8 with Xcode 4.2, and the other for Mountain Lion 10.8 with no Xcode:
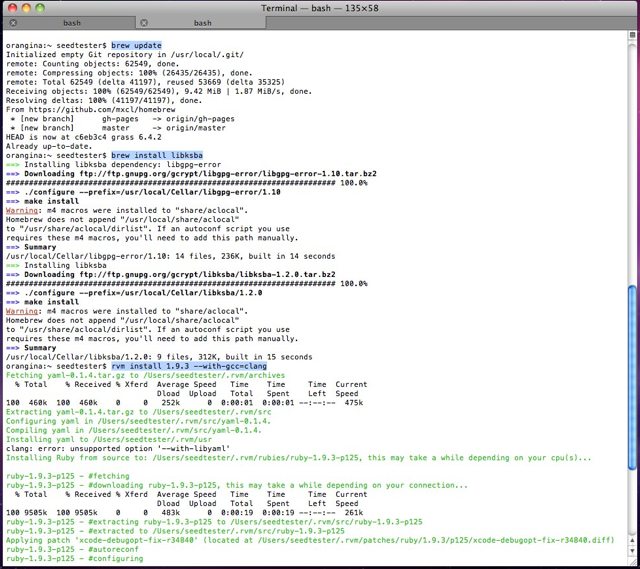
According to the requirements, we must first install libksba. This applies to Snow Leopard, Lion and Mountain Lion.
We can do that easily with Homebrew, but first we should make sure it is up to date:
12
$ brew update
$ brew install libksba
Since Homebrew is updated regularly, it’s advisable to run brew update before installing anything with Homebrew.Now we’re finally ready to install Ruby 1.9.3! If you’re on Snow Leopard, you need to add a flag to the command (as specified in the RVM requirements):
1
$ rvm install 1.9.3 --with-gcc=clang
If you’re on Lion, you need to install automake first:
12
$ brew install automake
$ rvm install 1.9.3
Otherwise, you will get this error when installing Ruby 1.9.3:
1
rvm requires autoreconf to install the selected ruby interpreter however autoreconf was not found in the PATH.
If you’re on Mountain Lion 10.8.2 with Xcode 4.5, you will need to run these commands first:
123456
$ brew update
$ brew tap homebrew/dupes
$ brew install autoconf automake apple-gcc42
$ rvm pkg install openssl
$ rvm install 1.9.3 (or `rvm reinstall all --force` in case you had already installed ruby)
$ sudo ln -s /usr/local/bin/gcc-4.2 /usr/bin/gcc-4.2
The steps above are necessary for you to be able to install Ruby
gems, such as Rails. Otherwise, you will run into errors such as these:
123456789
ERROR: Failed to build gem native extension

make: /usr/bin/gcc-4.2: No such file or directory

Could not create Makefile due to some reason, probably lack of necessary libraries and/or headers

The compiler failed to generate an executable file

You have to install development tools first
 If you’re on Lion, you need to install automake first:
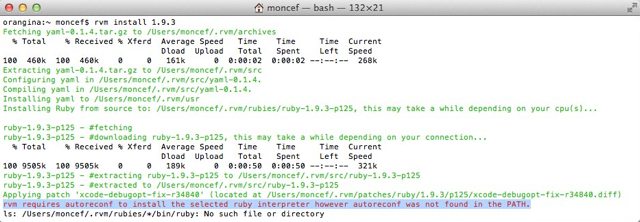 If you’re on Mountain Lion 10.8.2 with Xcode 4.5, you will need to run these commands first:
No comments:
Post a Comment